-

Launching 7/27: The First ClickCrafter Steam Playtest!
Check out the announcement trailer below: And sign up for the ClickCrafter playtest on Steam to be notified when it goes live next week! See you then!
-

Wishlist ClickCrafter Now!
Today’s the day! You can now officially Wishlist ClickCrafter on Steam: To celebrate, Terrorformer TD has had a price drop of around 30% in most markets, and is available with a special one day discount of another 35% off today Monday, June 22nd only! Subscribe here on the site for further updates, or follow us…
-

Coming Next Week: ClickCrafter on Steam!
Exciting news to share today, as ClickCrafter’s Steam page will officially be launching on Monday, June 22nd — with a public beta hopefully soon to follow! Here’s the game’s “short” description from the forthcoming Steam page: Stripped of your physical form on a mystical island, your only way out is to work with its cryptic…
-

Fun with Game Juice (Springs, Outlines, Squash & Stretch)
By layering on some simple — but incredibly responsive — game feel effects, it’s possible to create a game that feels incredibly alive and satisfying to interact with.
-

Adapting VirtualMouseInput.cs from the New Unity Input System for UI Toolkit
One of the most frustrating things about Unity is how fractured the documentation and support has gotten in 2026. It feels like you need to follow Unity (and not just Unity, but the various product teams specifically!) across multiple platforms just to have a hope of staying informed — and even then, you can be…
-
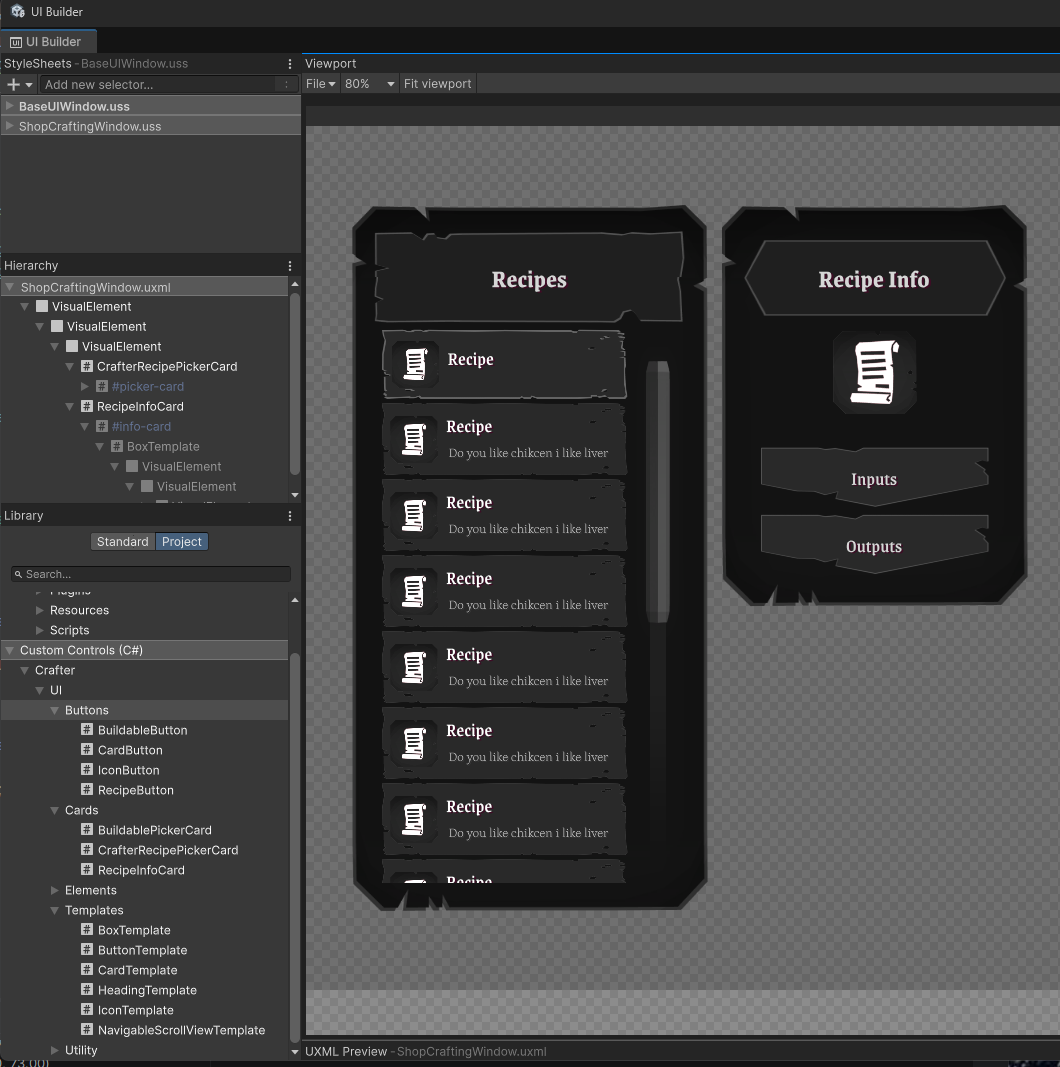
Nestable, Self-Loading Custom Controls in Unity UI Toolkit
Unity’s UI Toolkit is definitely a love-it or hate-it type of deal (and even when you love it, you will absolutely find ways and days to hate it!), but there’s no denying the ability to strongly define your UI controls and create reusable building blocks with common reactions and styles is an incredibly powerful one.…
-

Introducing ClickCrafter: A Cozy, Incremental Crafting Game
A new cozy idle/incremental game based around resource extraction, refining, and crafting — coming to Steam in 2026!
-

Autonomous Odyssey: Kickstarter Launched!
People reborn as robots relearn what it means to be human in this 2D Metroidvania indie game. Support now on Kickstarter!
-

Autonomous Odyssey: Demo Released!
Autonomous Odyssey is a story-driven, hand-drawn 2D metroidvania. Use agile platforming on your apocalyptic sci-fi journey to explore the labs once filled with exceptional researchers. Fight through vengeful robots on Pim’s quest to find his missing father and restore everyone’s humanity.
-
Terrorformer TD: Patch 1.2 & Steam Winter Sale!
Happy Holidays! Right in time for the Steam Winter Sale, Terrorformer TD version 1.2 is here! Enjoy additional QoL changes, unlock & upgrade spells in-game, and try out the reworked progression system (with over 350 starting perks to unlock!) — all at a reduced price for the next 2 weeks. Thanks to everyone who has…
Site Search
Tags
A* Pathfinding Autonomous Odyssey C# ClickCrafter Code Snippets Design Patterns Documentation Enemies Events Figma Game Design Gamedev Game Release GitHub Grids Hexagons Level Design Map Meet the Towers News Patch Notes Playtesting Progression RPG Stats Scriptable Objects Steam Terrorformer TD Tower Defense UI Design UI Toolkit Unity Wireframing